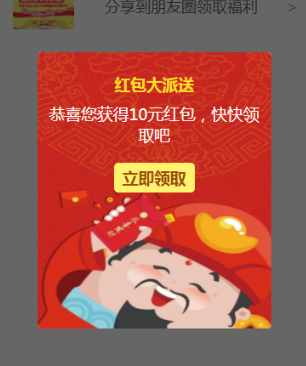
从小程序基础库版本 1.6.3 开始,小程序支持简洁的组件化编程。开发者可以将页面内的功能模块抽象成自定义组件,以便在不同的页面中重复使用;也可以将复杂的页面拆分成多个低耦合的模块,有助于代码维护。自定义组件在使用时与基础组件非常相似。接下来我们通过创建一个在页面上的弹屏组件,来看一下如何创建并使用一个自定义组件。
创建组件
声明组件
类似于页面,一个自定义组件由 json wxml wxss js 4个文件组成。要编写一个自定义组件,首先需要在 json 文件中进行自定义组件声明(将 component 字段设为 true 可这一组文件设为自定义组件)
编写组件模板和样式
同时,还要在 wxml 文件中编写组件模版,在 wxss 文件中加入组件样式,它们的写法与页面的写法类似。详情可参考 组件模版和样式 。
组件模板
1
2
3
4
5
6
7
8
9
10
11
12
13
14
15
16
| <view class="pop-alert-box dialog">
<view class="alert-content-box">
<image src="../../images/icon_alert.jpg" class="icon-image"></image>
<view class="alert-content">
<view class="title">红包大派送</view>
<view class="title-doc">恭喜您获得{{count}}元红包,快快领取吧</view>
<view class="btn_box">
<view class="button type_red" catchtap="callback">立即领取</view>
</view>
</view>
</view>
<i class="iconfont icon-close" catchtap="close"></i>
</view>
</view>
<view class="alert_mask" catchtap="close"></view>
|
在组件模板中可以提供一个 节点,用于承载组件引用时提供的子节点。用于承载组件使用者提供的wxml结构。可以使组件的内容更加灵活。
组件样式
1
2
3
4
5
6
7
8
9
10
11
12
13
14
15
16
17
18
19
20
21
22
23
24
25
26
27
28
29
30
31
32
33
34
35
36
37
38
39
40
41
42
43
44
45
46
47
48
49
50
51
52
53
54
55
56
57
58
59
60
61
62
63
64
65
66
67
68
69
70
71
72
73
74
75
76
77
78
79
80
81
82
83
84
85
86
87
88
89
90
91
92
93
94
95
96
97
98
99
100
| .pop-alert-box {
position: fixed;
width: 550rpx;
height: 650rpx;
margin-left: -275rpx;
top: 20%;
left: 50%;
z-index: 2001;
text-align: center;
}
.alert-content-box {
width: 100%;
height: 100%;
position: relative;
background: #fff;
border-radius: 10rpx;
text-align: center;
}
.alert-content {
padding: 20rpx;
position: absolute;
top: 30rpx;
text-align: center;
}
.title {
font-weight: bold;
color: #ffdd25;
}
.title-doc {
padding-top: 20rpx;
color: white;
}
.btn_box {
width: 100%;
padding-top: 40rpx;
display: flex;
justify-content: center;
}
.button {
background: #fff26f;
padding: 10rpx 20rpx;
border-radius: 10rpx;
}
.type_red {
color: #a04d03;
font-weight: bold;
}
.icon_alert {
width: 100%;
}
.icon-image {
width: 100%;
height: 100%;
border-radius: 10rpx;
}
.icon_alert_dialog {
width: 200rpx;
height: 200rpx;
margin: 0 auto;
}
.icon-close {
display: inline-block;
font-size: 60rpx;
color: #dedede;
margin-top: 50rpx;
}
.alert_mask {
background-color: rgba(0, 0, 0, 0.6);
position: fixed;
z-index: 2000;
bottom: 0;
right: 0;
left: 0;
top: 0;
display: -webkit-box;
display: -ms-flexbox;
display: flex;
-webkit-box-pack: center;
-ms-flex-pack: center;
justify-content: center;
-webkit-box-align: center;
-ms-flex-align: center;
align-items: center;
}
|
注意:
注册组件
在自定义组件的 js 文件中和页面的js不同,需要使用 Component() 来注册组件,并提供组件的属性定义、内部数据和自定义方法。
组件的属性值和内部数据将被用于组件 wxml 的渲染,其中,属性值是可由组件外部传入的。详情可参见 Component构造器 。
1
2
3
4
5
6
7
8
9
10
11
12
13
14
15
16
17
18
19
20
21
22
23
24
25
26
27
28
29
30
31
32
33
34
35
36
37
| Component({
properties: {
show: {
type: String,
value: false
},
count: {
type: String,
value: ''
}
},
data: {
},
methods: {
close() {
this.setData({
show: "false"
})
},
callback() {
console.log("");
this.triggerEvent('customevent', {})
}
}
})
|
自定义组件触发事件时,需要使用 triggerEvent 方法,指定事件名、detail对象和事件选项,例如上述代码的callback方法,其中customevent 是在引用组件时通过bindcustomevent指出的:
1
| <bottom-screen show="true" count="10" bindcustomevent="onReceivingTap"></bottom-screen>
|
使用组件
引入组件
使用已注册的自定义组件前,首先要在页面的 json 文件中进行引用声明。此时需要提供每个自定义组件的标签名和对应的自定义组件文件路径:
1
2
3
4
5
| {
"usingComponents": {
"bottom-screen": "/components/bottom-screen/bottom-screen"
}
}
|
使用组件
在引入组件之后,在页面的 wxml 中就可以像使用基础组件一样使用自定义组件。节点名即自定义组件的标签名,节点属性即传递给组件的属性值。
1
2
3
4
| <view>
<bottom-screen show="true" count="10" bindcustomevent="onReceivingTap"></bottom-screen>
</view>
|
自定义组件的 wxml 节点结构在与数据结合之后,将被插入到引用位置内。
Tip
- 对于基础库的1.5.x版本, 1.5.7 也同样支持自定义组件。
- 因为WXML节点标签名只能是小写字母和下划线的组合,所以自定义组件的标签名也只能包含小写字母和下划线。
- 自定义组件也是可以引用自定义组件的,引用方法类似于页面引用自定义组件的方式(使用
usingComponents 字段)。
- 自定义组件和使用自定义组件的页面所在项目根目录名不能以“wx-”为前缀,否则会报错。
- 旧版本的基础库不支持自定义组件,此时,引用自定义组件的节点会变为默认的空节点。
结果展示
当组件显示的时候,显示的是如下的效果:

参考文章
1、小程序自定义组件
